My expensive custom draperies don’t look nice anymore, now what?
Custom draperies are not just a luxury. They are an investment, an investment which can easily run to thousands of dollars or more PER WINDOW. With nicer designer fabrics running upwards of $150-$200 per yard, multiplied times, say, 9 yards of fabric for each window, you will have possibly $1300 to $1800 invested in the fabric alone per window. This does not include labor for drapery construction, purchase and installation of drapery rods, or decorative trim.
Nothing warms up a room better than beautiful soft furnishings, and the right window treatments finish a room like nothing else can. That is why you want to get at least 12-15 years or more of good use from your gorgeous expensive custom draperies.
Here are the stage curtains in Lincoln Center in NYC, with hundreds of yards of fabric, which I snapped before a performance of “The King and I.” I can’t even imagine the work and expense that went into a drapery project of this magnitude. There must be 1500 pleats in those bad boys.

But, I digress…
My own library/family room has four large double-hung windows plus a triple window. And, after almost thirteen years of hanging, my beautiful imported linen damask draperies were really starting to show their age.
When I come into your home for an interior consultation, I do everything possible to help you work with what you have.
So, I want to show you how I re-worked the look and feel of the draperies in my own space, for a very small fraction of what completely replacing them would have run.
Here is the before, shown on the triple window:
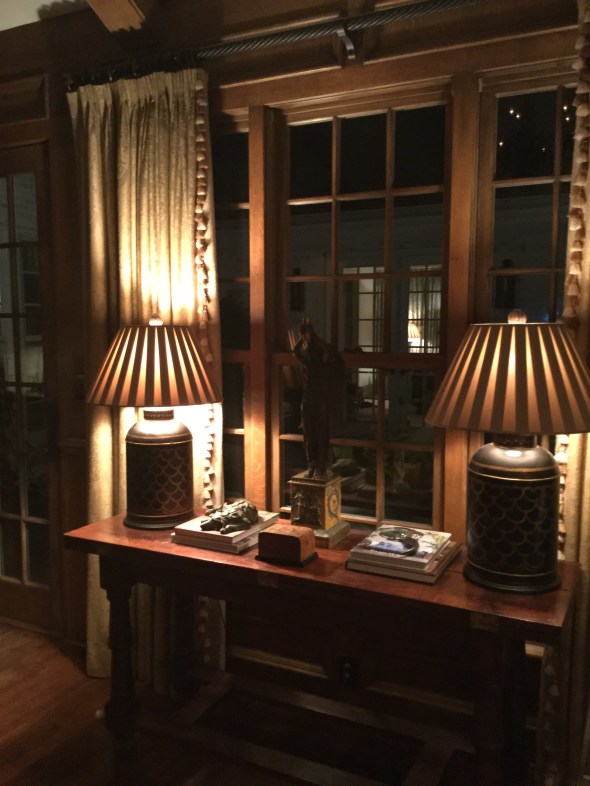
Not horrible, but here is what you can’t see in the photo:

Really bad faded places on the edge. That is not a shadow. That is where the old trim was. And, see how many panes are covered by the fabric? The fabric was smothering the courtyard and backyard views.
The drapery trim was looking dated, and frankly, the tone-on-tone look did not hold its own with the colorful Serapi carpet, see below, that is “the boss” of the room.
 P
P
The poles have also always bugged me. They weren’t the correct length (hopefully you can learn from my mistake made long ago) and are part of the reason why the fabric faded so badly. Drapery rods should extend a measurement of 12-15 (sometimes more) inches from each side of the outer edge of the outermost window pane. This extra foot on each side adds gravitas to the window when the panels are hung, and allows the drapery fabric to be more protected from sun exposure, since the fabric is pushed further away from the window panes.
For example, my windows measure 35″ wide (inside the frame) and my new poles are 60″ long, not including the decorative finials. This is not an in-stock standard size from the company I ordered from, so I incurred a custom-cut fee, but if you are going to do it, do it right!
Here are the re-worked draperies with the new flat ribbon trim, in a beautiful poppy color that repeats the colorful poppy red accents in the carpet and also used elsewhere in the room.
 The fresh-looking quatrefoil motif echoes the ancient patterns of the carpet. For your comparison, notice how the draperies look, first hung on the old too-short rod and then on the new longer rod. First here are the re-worked panels on the old, shorter rod. See how only one full vertical row of glass pane is visible? This is still exposing the fabric to damaging light rays for sure. Remember, this is the old rod:
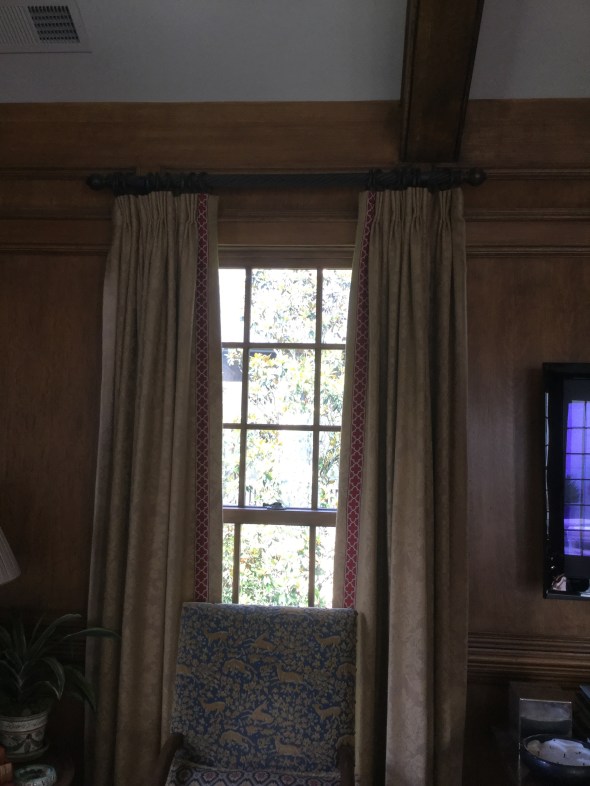
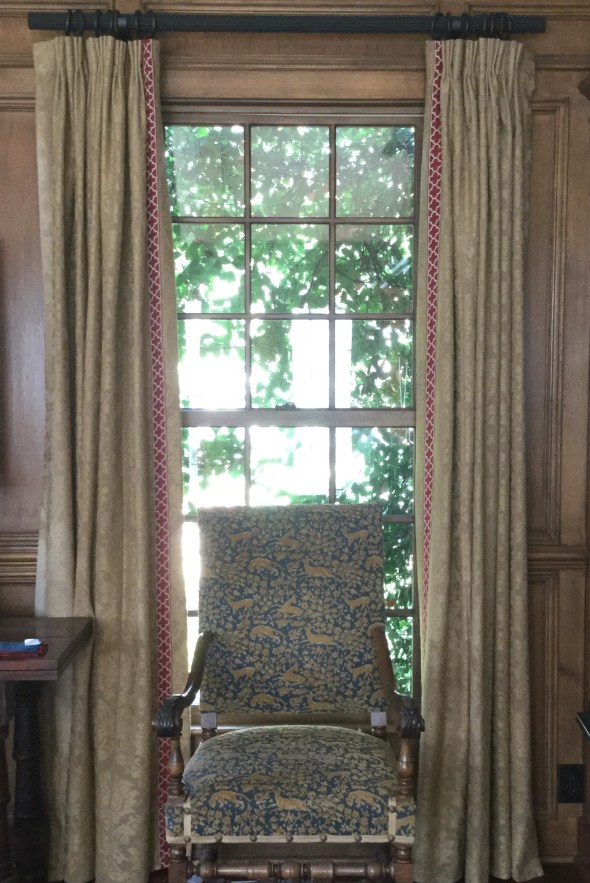
Now here is the “new” drapery hung on the new longer wood rod, below. See how all three vertical rows of window pane are now showing? This also gives the windows more elegance and importance, because the draperies are now ‘framing’ the windows instead of ‘covering up’ the windows. My drapery professional will be coming soon to re-hang the panels to fall perfectly, and there will be absolutely no sagging. The finials have not been reattached. But, this will give you the gist of the new work.
Here are the mechanics of the new work:
The old trim–all thirty yards of it– was meticulously hand-clipped off with tiny embroidery scissors (by moi, it was actually kinda fun and reminded me of my smocking days). I spot-cleaned and freshened each panel in the dryer (see below), then it was off to the workroom with all 10 nine-foot panels and 30 yards of colorful new trim.
The new trim was sewn onto the opposite edge of the panel of where the old trim had been. So, on each pair of draperies, the right panel became the left panel. Now, when the panels are professionally hung by the fabulous man I always use, the faded edge is going to be tucked and turned away out of sight toward the wall (called “the return” in my biz), and the fresher edge (now the “leading edge”) sports the brand new trim. Pretty clever, right?
My wonderful to-the-trade workroom professionally re-pressed each panel after the new trim was sewn on, now the panels look (almost) brand new. It really gives a new look and feel to the windows specifically, and to the room as a whole. I’ll be sure to share a wider view when everything is finished.

So, there you have it! Before:
And (almost finished) after:
Don’t you agree that the windows look bigger?
And, just for you, a couple of my best drapery tips and caveats….
- skimpy draperies are not worth doing. They will still be somewhat costly, and it is much better to install budget-friendly woven wooden shades (similar to below) than to pay for draperies that aren’t right.

- a good designer can help you “cheat” a solid fabric. Meaning, a knowledgable decorator can help you find a less-expensive solid and most people would not be able to really tell if it is a nice little Pindler or a break-the-bank Brunschwig. But remember, construction/labor costs are going to be similar whether the fabric is $5 a yard or $500 a yard, so make sure you are buying a quality fabric from the start.
- a good professional drapery installer is your best friend. S/he is trained to get everything looking perfect, and will know every trick in the book to get it right. While bloggers like myself are generally generous with our sources, don’t expect us (as design professionals) to divulge names on this one, however, unless you have hired us. The best installers often won’t work directly with the public.
- your favorite shelter magazine will usually have a wealth of photos of gorgeous drapery to use for inspiration. Your design professional is invaluable in deciding whether to do woven wood shades, a roman shade, fully operable draw drapery, rings and poles, etc. We have seen it all, and we can help you avoid an expensive mistake. And, yes, you need to line and interline your custom draperies. It is worth every penny.
- some installations will benefit from using woven wood shades IN ADDITION to existing drapery. Open any “house” magazine and surely there will be a feature to show you what I mean. I love the look, and plan to add woven wood shades to my own family room.
- avoid treatments that are trying too hard, like this one in a current popular shelter magazine this month, which is just bizarre in my opinion with its ultra-wide flat tape mitering into those ultra-thin ironed-in pleats.

- soft pleats generally look more elegant than heavily ironed-in pleats.
- never dry clean your draperies. They will shrink and then they will be too short. Use the upholstery attachment of your vacuum cleaner (on lowest possible suction, by opening the suction control tab) to keep dust and pet hair at bay.
- you can usually air-fluff most panels (no heat!!!) in your home dryer to freshen them. Remove any drapery pins and corner weights before doing this, and try 20 to 30 minutes. I always spot clean first whenever possible, and on heavier fabrics, you can usually safely spray some lightly scented fabric refresher before fluffing. A dryer sheet is also a possibility. Go slowly, proceeding panel by panel, to avoid damaging the fabric. Did I say, no heat?
- for pole-and- ring type installations, try a long strip of clear silicone tape called “curtain slide tape” on top of the pole to help the rings slide more smoothly when closing.
If you reside in the Birmingham metro area and need help with an interior project of your own, I’d love to hear from you. I also accept limited online and out-of-town commissions for color consulting. Please email me for rates and availability: colorcalling@gmail.com
Best,
Ellen


Great post Ellen!
May 24, 2017 at 6:23 pm